Saturday, July 17, 2010
What to do with those little leftover bits of bias binding
Thursday, March 11, 2010
Nothing to be afraid of, folks...
It's useful stuff for making false hems (especially on heavy fabrics and curved hemlines)....
...doing cute details on twirly skirts for small girls.... or big girls, for that matter. (My usual model had better things to do today. This one is equally headless but a little more compliant).

Bias binding is excellent for binding seams on tricky shaped bags and purses (which means that you can fully line the tricky shaped bag or purse). It's a design feature, to boot.
And you can make quick bibs, pot holders and even mini-oven mitts in no time at all. This one was a request from the smallest cook in the house. (I'm a bit nervous that it might actually be used to carry something hot, so it comes with a list of rules.... luckily, our cook follows rules... mostly).
So anyway..... I tend to be a bit evangelical about bias tape makers. I was surprised to read that some people buy them and don't try them out. Or some people don't know how to get the most out of them. I've shown this before, but I'll add a bit more detail this time. Complete demystification.
How to use your bias tape maker...

2. If you need to join two pieces, align them so that they are right sides up and the pointed ends lock in to one another, as shown below.
(It's also a good idea to press your fabric before you start..... I seem to have skipped that step here).


6. Cut the end of the tape to a point and thread it through the bias tape maker (cutting it to a point makes it thread more easily).
Slow motion replay...Use the pressure of the iron to hold the tape in place while you pull the bias tape maker a centimetre or two. Then move the iron up to the very end of the bias tape maker. Joosh it with steam. Pull another centimetre on the bias tape maker and then move the iron up to the bias tape maker.... that sort of thing...).
8. Trim the seam allowances so the bias binding will be able to fold easily over the edge and sit on top of the stitches (seen in red, below) on the other side.

9. Press the bias tape into place over the stitch line, and then topstitch it about 1mm from the edge.

I hope that takes a bit of the mystery out of it and encourages you to go forth and bind everything you can. Like I do. Honestly, I really do.
Saturday, June 6, 2009
Just one more and then I'll stop...
The gorgeous Justine dropped in with the newest MixTape yesterday. Our little girls played, we chatted. I think I might have given her a few ideas about ways to use her little one's beautiful paintings (which has got to be better than what I shared with Jodie!).
Thursday, January 1, 2009
Sewing up a storm...
Thursday, August 21, 2008
..and it only took me NINE HOURS!!!
I'm packed and ready for that taxi to the airport in the morning!! I packed, re-packed, weighed and re-packed, and I now have three 20kg bags (luggage capacity for the whole family!!). That's just the patterns and sample bags. Our personal stuff will be in hand-luggage! I have NO IDEA how we're going to manage this load once we leave the airport and those handy little airport trolleys. There are only two of us who are big enough to carry more than a teddy-bear. Ho hum.... we'll work it out (she laughs nervously).
All going well, I'll be on the third floor with Living Creatively at the Stitches and Craft Show from 1pm tomorrow, and then all day Saturday and Sunday. I'm looking forward to catching up with Cathy and Louise there tomorrow, and then Fi and Justine will be there on the weekend. Gosh, it'll feel just like home... or at least like the Melbourne S&C show in March!!!Friday, August 8, 2008
Another Bias Tape Tutorial
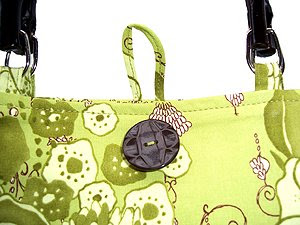
HOW TO MAKE SUPER-QUICK BUTTON LOOPS....
1. Following the instructions in the 6mm "Clover" Bias Tape Maker packet (or this tutorial), make a length of tape - BUT YOU CAN CUT IT ON THE STRAIGHT GRAIN IF YOU WANT TO MAKE IT EASIER TO SEW!!!
2. Fold the tape in half lengthwise and press it again, keeping all the raw edges of fabric on the inside.
3. Stitch the two folded edges together (or zigzag over the full width of the folded fabric if you are uncertain of your ability to sew accurately on narrow things).
4. Measure a loop to go around the button of your choice and add extra for the seam allowance at both ends. Trim away the excess.
5. Attach the loop (UPSIDE-DOWN, to the RIGHT SIDE of the top CENTRE-BACK edge of your bag) with a few stay-stitches.
6. Attach your facing/lining in the usual way, and sew a button at CENTRE-FRONT.
Voila! Matching button loop in minutes... and no burned fingers!!
You can also use the larger sized bias tape makers for larger button loops. Below is the inside of the (WIP) Carry-All bag, and a larger loop is on the notebook computer compartment pocket.PS. The finer points of making a button loop closure can be found in these pattern instructions....
Thursday, August 7, 2008
Laptop Bag Pictures
Good things come to those who wait.... and this is going to be VERY GOOD. But you're going to have to wait a little bit longer.... sorry (insert apologetic, kind-of wincing smile here).
So what's all the fuss about Bias Tape Makers...?
Little wonder that a few were mentioned on "This Is My Trade Secret" posts, or in the comments following. I particularly like the Clover Bias Tape Maker (well, Clover seem to do a pretty good job of just about EVERYTHING, don't they?). Since discovering them I've bought one in every size and have been happily binding anything I can possibly bind. After years of doing this the LONG WAY around, I can't get over how quick it is now.
A bias tape maker makes perfect bias tape in the fabric of your choice, and makes it so that the seam allowances go ALL THE WAY TO THE CENTRE (unlike the store-bought variety), so there's little chance of fraying edges if you go a little bit wobbly with your stitching!! A quick tutorial.... Using both the 6mm and 18mm Clover Bias Tape Makers (in case you were wondering).
1. Measure a bias strip to the width specified in the instructions (in the packet) for your particular size bias tape maker. A quilting ruler and cutting mat make this super-quick and accurate (both ruler and board usually have bias guides, so you can follow whichever is easiest for you).
2. SnnnnnnnniP!... a rotary cutter makes this a breeze. If you haven't got one you'll just have to use old fashioned ruler, chalk and scissors. Cut your bias strip out.
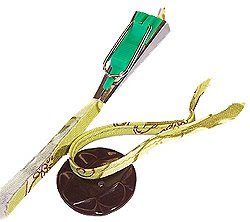
3. Cut one end of the bias strip to a point to make it thread more easily through the little wonder-gadget.
With the Clover 6mm bias tape maker there's a handy little hole in the bottom that allows you to move the fabric through with a pin. Aren't Clover clever...? They think of EVERYTHING!
4. With the iron in one hand and the little handle of the bias tape maker in the other, simultaneously slide the bias tape maker backwards and press the tape immediately as it comes out at the front. The raw edges will be folded neatly into the centre of the tape.
Now you have lots of lovely bias tape to make pretty bound edges or decorative applique on bibs, bags, purses, laptop sleeves, pockets, pot-holders... you name it. I'll be posting another tutorial for the 6mm bias tape maker as soon as possible.... watch this space! 
Isn't that easy...?
If you're new to actually USING bias tape then it might be best to come to "A Sharper Edge" class, read a sewing book or buy my ...ahem... Laptop Bag pattern (if I can stop blogging long enough to finish those instructions!!!). I'm currently working on more detailed bias tape instructions for that one. I told people that the pattern was "coming soon" in January (!!?) but keep coming up with new ways to vary the design... which means MORE instructions to write!!!
Oh - and I am absolutley GOBSMACKED by the number of responses to my little giveaway (and am blushing CRIMSON with all your lovely compliments!!). We might have to find out all about this random number generator thingame I keep reading about.... There are too many names to cut up bits of paper and put in a hat - we'd be at that all afternoon!
Stay tuned tomorrow to see who's the winner. Get ready to contact me with your postal address (and yes - I'm quite happy to post internationally!!).