

This shopping bag is simple enough for relative beginners to sew, and is a quicker alternative to the Zip-Away Shopping Bag (although not as fancy!). It is made to roll up, so that it can be carried conveniently in a handbag.

I'll be demonstrating how to make this foldaway shopping bag at the Spotlight Inspiration Space at The Royal Melbourne Show on Wednesday, so I thought it best to have the back-up of the process written up as a resource for everyone to tap into. If you're going to the show, you can find me there at these times. I'll be adding tips and tricks and lots of chat to these basic instructions, so do come along - you might learn something and you'll make me feel a bit better for having an audience!

(My apologies for the quality of the photos in this tutorial. Limited time during daylight hours and an AWOL digital camera resulted in these being shot on an iPad at night time. But you know... it's free...so who's complaining...?)
Simple Foldaway Shopping Bag
YOU WILL NEED:
3 x fat quarters 2 x matching, 1 x contrast
35cm x 6mm or 12mm elastic
35cm double-sided fusible Peltex / Legacy Fuse And Shape / Fast2Fuse
1m x 15-20mm fusible tape with paper backing or vliesofix cut into strips
A tailors awl/stiletto
A. CUT
Matching Fat Quarters –
2 x Length (parallel to selvedge) of fat quarters (about 50cm) x 50cm. Tidy up to make all edges straight and all corners 90-degree angles.
Elastic - 1 x 20cm 1 x 15cm
Contrast Fat Quarter –
Straps – 2 x Length of FQ x 10cm
Base – 2 x 37.5cm x 15cm
Double-sided Peltex/Legacy Fuse and Shape / Fast2Fuse - Bag Base – 34.5cm x 12cm, with the length running parallel to the side edges of the Peltex, as it comes off the roll.

B. PREPARE
1. Fold the bag body in half lengthwise and snip a small notch top and bottom to mark the centre points of both edges.
2. On the top edge, measure and snip notches 9cm and 11cm from the centre notch on both sides of centre. On the bottom edge, measure and snip notches 17.5cm from the centre notch on both sides of center.

1. Fold the bag body in half lengthwise and snip a small notch top and bottom to mark the centre points of both edges.
2. On the top edge, measure and snip notches 9cm and 11cm from the centre notch on both sides of centre. On the bottom edge, measure and snip notches 17.5cm from the centre notch on both sides of center.

3. Fold and press the straps to make a 4-fold strap.

4. Topstitch
the strap with four or five even rows.


5. Fuse the Peltex between the two layers of the base fabric,
leaving an even seam allowance around all four edges.


6. Fold the base in half lengthwise and widthwise, snipping a
notch to mark the centre on all four sides.
7. Fold elastic in half and stitch the raw ends to the centre
notch on one of the short ends.


C. SEW THE BAG
1. Seam the side seams of the bag body. (I like to use a French Seam, but you
could equally plain seam with a 12mm seam allowance and overlock or zigzag the
edges.)
To sew a French seam:
a) Place the two bag pieces wrong sides together and stitch the side seams with a 4-5mm (a very scant ¼ inch) seam allowance, backstitching at both ends of the seam.
b) Press the seam allowances open.
c) Turn the back wrong side out. Press the side seams flat, folding neatly along the seam line.
d) Stitch the seam with a 6-7mm (a generous ¼ inch) seam allowance, backstitching at both ends of the seam.

a) Place the two bag pieces wrong sides together and stitch the side seams with a 4-5mm (a very scant ¼ inch) seam allowance, backstitching at both ends of the seam.
b) Press the seam allowances open.
c) Turn the back wrong side out. Press the side seams flat, folding neatly along the seam line.
d) Stitch the seam with a 6-7mm (a generous ¼ inch) seam allowance, backstitching at both ends of the seam.

2. On the bottom edge of the bag, find the centre notch and
align it with a centre notch on one of the long edges of the bag base, with the
right side of the bag fabric facing the side of the base that has the elastic
on it. Pin the centre notches together with the pin at a right angle to the
edge of the fabric.
3. Align the bag fabric to the long edge of the bag base, matching the notches on the bag fabric with the ends of the Peltex within the bag base. Pin them together exactly at this notch point, with the pin at a right angle to the edge of the fabric, as shown below. There should be 1.5cm seam allowance overhanging beyond the pin.

4. With a 1.5cm seam allowance, stitch between the outer pins
(without crossing over them) to attach the bag to the base along the long edge.
Repeat steps 2 to 4 to attach the other side of the bag to the base.


5. Snip at a 45-degree angle from the edge of the seam
allowance to the very ends of the backstitched seams.
6. Match the unattached part of the bottom edge of the bag to
the base, aligning the centre notches on the base to the side seams of the bag. If there is any excess fabric in the bag, smooth it into a
tuck at the side seam, so that the fabric sits smooth and flat at the corner
points.
7. Backstitching at both ends of the seam, stitch across the short ends of the bag and base with a 1.5cm seam allowance.

8. Overlock/serge or zig-zag around the four sides of the bag
base, catching all layers of fabric in the stitch.

9. With the bag fabric to the top as you work at the machine, fold the seam allowance on a
long edge of the base to match its outer edge to the seamline.
Use an awl to help hold the fabric in place, and stitch the edge of the
seam allowance down, a few mm from the overlocked edge. Repeat this for the other long
edge, and then each of the two short edges, in turn.

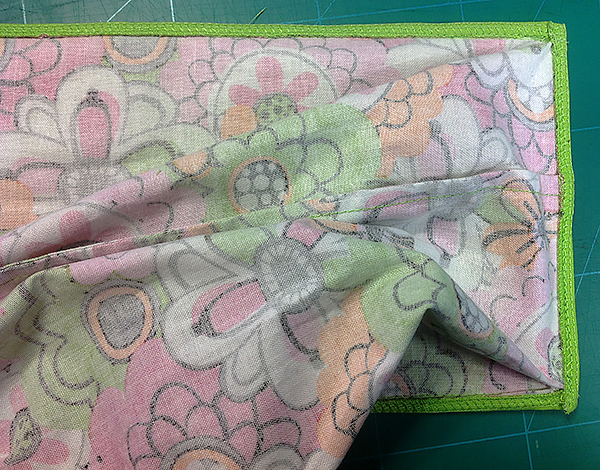
You have now attached the base – turn it through to the
right side.
D. ATTACH THE HANDLES
1. Fold the 15cm length of elastic in half and – on
the right side of fabric – stitch the loop in place over a centre notch on the
top edge of the bag, as shown below.
2. Again, on the right side of fabric, centre the raw ends of a
straps to the notches on the top edge of one side of the bag. Making sure that
there are no twists in the strap, pin and then stitch the strap firmly into
place about 1cm from the edge of fabric. Repeat for the other strap on the
other side of the bag.

3. Fuse 15mm (5/8'') fusible tape (or strips of fusible webbing cut with a ruler and blade to this width) on the right side of fabric, all the way
around the top of the bag, aligning the edge of tape with the raw edge of fabric.


4. Fold and press the top edge, using the paper as an edge to
make a clean fold.


6. Topstitch the hem turning to the bag
fabric, 1-2mm from the inner folded edge.

7. Lift the straps out of the bag. Working on one strap end at
a time, smooth the strap (from where it attaches to the bag) over the top
edge.


8. Turn the bag to the right side of fabric and stitch a reinforcement x-in-a-box shape between the top of the bag and the hem stitchline, to hold the strap firmly in place.

9. With the elastic still facing down into the bag, stitch a reinforcement over the ends that are enclosed within the hem.

You now have a finished bag!

You can fold up the bag from top to bottom, and then roll it into the base. Flip the elastic around the whole she-bang and you’re ready to go shopping!


Don't forget to check in to my Classes page to find out about the online and real life classes that I teach, and/or follow me on Facebook, Instagram or Twitter for updates.

You can fold up the bag from top to bottom, and then roll it into the base. Flip the elastic around the whole she-bang and you’re ready to go shopping!


Don't forget to check in to my Classes page to find out about the online and real life classes that I teach, and/or follow me on Facebook, Instagram or Twitter for updates.


