Showing posts with label supplies. Show all posts

Tuesday, May 1, 2012

You asked for it....

For those of you who have been waiting patiently (or hounding and begging  me on a regular basis), I've AT LAST scheduled some new dates for classes at my studio in Northcote.
 I'm not sure how many places are left on each class, now that the waiting list people have been contacted.  Remember that a class in my studio is a cosy, small-group affair.  I only take 6 people in at a time, so you're ensured maximum attention and lots of space - which means that classes book out fast.  My advice would be to get in QUICKLY!
 So far, we have... (click on the links for details and bookings)

Saturday 4th August - Customised Bag in a Day
Saturday 25th August - Zippers for Bags

1st September - Purse Frame Workshop 
6th October - Beginner's Bag in a Day

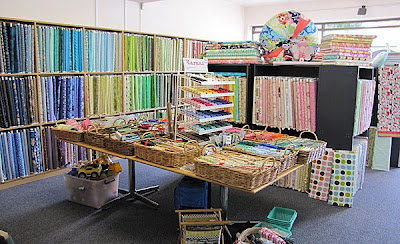
Adele has been busy rearranging the showroom.  The mysterious stash of bag hardware that was formerly kept in the office (for internet sales) has been moved to the shelves where you can fossick through and find all manner of treasures... do come in and have a fossick. 

We also have a bargain bin of hardware, bargain zipper bundles and super-bargain "slight second" purse frames.


..And behind the scenes, we're tinkering away at a few other things.  More news soon.

Tuesday, February 28, 2012

Out of my head...

...At last.

A few weeks ago this jumper on Ravelry prompted a few ideas to start kicking around in between my ears.  This afternoon I treated myself to a spot of half-scale fun, after a boring few days of computer spreadsheets.
 The jumper, although a clever idea, is not a shape that will work for me.   At my size, if I don't have sufficient body-reference in a garment, I risk looking like a crumpled pile of fabric sitting on the floor. 

But the whole thing has got me thinking.  Tying the concept in with the bits I know about subtraction cutting and draping, I think I can feel my brain a-popping.....
 I'm not sure when I'll get back to this and where it'll go, but today's little interlude was a welcome sanity-break from the computer. Hopefully, now the ideas have been explored a bit, my kicking and popping brain might be quiet for a while.

(Ms Myrtle&Eunice, avert your Graphic-Design-sensitive eyes NOW!)
The good news is that I've finished the new wholesale product listings and brochure.  
That was the job I had to do before I allowed myself to play dress-ups with my half-scale dummy.
And yes - twist-locks, plastic satchel fittings, brass o-rings, snap o-rings, magnetic catches, wire-formed d-rings and slide-adjusters are all now on the wholesale list. 
Start asking your favourite local or online stockist for them NOW!


PS.  ....and speaking of getting you to make me look popular... If you read this blog but don't officially "follow" it, please follow it.  If you're on Facebook and like what I do, please like my business page (not my personal one - that doesn't count).  If you live in the USA and want to see my book there, please check in here regularly, share the blog-love and Facebook-love with your friends etc.... We have to impress a few US publishing big-wigs here, and web statistics speak volumes.

PPS. Is that too cheeky...? (I mean, I'm not asking you to make stuff up.... just put your hand up if you're interested..... know what I mean?)

Monday, August 29, 2011

New rings and workshops.

Yep - I finally tracked down hinged o-rings! If these are what you've been looking for, you'll find them HERE!!
And since the Purse Frame and Bag in Day Workshops keep booking up and over, I've scheduled two new dates. Purse Frame Workshop - Sat 29th October 2011 - details HERE.


Bag in a Day - Saturday 3rd December 2011 - details HERE.
And I believe there are still places available on the Pattern-Free Wrap Skirt Workshop next weekend..... details here.

Wednesday, May 11, 2011

My Local....

Fabric store, of course (...I can't remember the last time I was in a pub). I love GJ's Discount Fabrics in East Brunswick. And I think it's even better, now that all the patchwork fabrics are downstairs. The room is huge and light and full of colour. Gosh, there are even a few nice hat and bag samples.

GJ's were among the first stores to take on my patterns, way back in 2004, and have always supported me with lots of display space for samples.

They've always been good at keeping things fresh.... trying new things, turning over huge volumes of fabrics and always bringing in new ranges. (I love this Sherbet Pips range....it makes me want to make a quilt!!). They have great sales and bargain baskets (today I saw some Kaffe Fasset short ends for $8 per metre). Get on their mailing list!

And now they're the first to take on my first range of 'in store' bag hardware, to accompany the pattern range. So you can get all the bits to make the bag from the one place. No need to pay postage. We often talk about the great online craft community, but I love my local-real-life craft community, too. GJ's is a bit like the bar where everyone knows your name. A hub. I always bump into people I know, and the staff seem to know everyone. They focus on the real-life store and their customer service, and are constantly striving to improve both.

Even if this sounds like an infomercial/advertorial, it isn't. I just really love what they do and I appreciate their support.

Do you have a 'local'...? (And ...ummm...do you think they might like to try a bit of bag hardware..?).

PS. We've also begun wholesaling bulk quantities of hardware to makers of handcrafted bags and purses. If you'd like to order rings, frames etc in quantites of 50's and/or 100's, drop us a line and we can send you the relevant info. (Note: There are minimum order quantities).

Thursday, March 31, 2011

I'm listening....

We've had a few requests for double purse frames lately, so I thought I'd try getting a few in. These frames are 150mm (6") with a curved edge, and are available here. If you like (and buy!!) them, I'll be able to continue the supply. I may even get around to making a pattern for them ...eventually. I have a few 150mm purse frames in CHUNKY style (like the 200mm chunky frames, only shorter!!). They're available here. And we also have some 200mm Chunky frames with loops for a purse chain. (We also have the chain). I think these would look cute on the Kiss Purse. We've had a lot of requests for o-rings that can be opened and linked onto other loops or eyelets. I found these.... 60mm diameter with 4mm wire. We also have some new antique o-rings. These are 25mm (1") and in 3mm wire, and you can find them in the shop here.
During an overhaul of postage prices (thanks Australia Post for giving us reason to do this on a regular basis....), we've taken the opportunity to make a much-needed increase to our packaging and handling fee (from $2 to $3 per order).


This will go some way towards paying for the time it takes the lovely office gals to give you the best service they can and find the most economical postage method for you.... as well as pay for bubblewrap, tissue paper, labels, sticky tape and envelopes. Rather than increasing all our prices, I felt that the "user pays" method would be fairer.


(So... the more you order per order, the better for you..... How's that for justifying your stash-building???)

Wednesday, October 27, 2010

New stuff

Do you need to refresh your zipper stash?  I did recently.
 

I always like to keep a big box of randomly assorted colours, lenths and type of zip, so that whatever I'm sewing, I know that I'll be able to match a zip to it, should the need arise.  Lately, the stash was somewhat depleted and I found myself having to interrupt the creative flow to go to Spotlight and pay between $1-$3per zip.  I hate that. 

So... I went and bought myself an ENORMOUS box of zips!!  They've arrived just before I have to move studio, so I've decided to sell off the excess. 

You too, could have a random assortment of very useful zips.  A bundle of 15 brand new zips for $5.50 (including metal and chunky-teeth, dress zips and purse zips) is a pretty good deal (that's about 36 cents each).  Get yours HERE!

If you come into the studio, you can choose your own, otherwise it'll be completely random (making sure you get a good cross-section of styles).


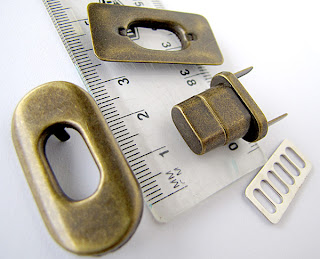
The Twist locks were so popular, I now have them in antique brass colour.  These  are a secure closure and add a super-swish detail to any handmade bag (sooooo professional!!!).

I also have a couple of new patterns in the works.  I need to test one on an ABSOLUTE beginner.....  If you have an eye for typos, an understanding of grammar and want to (or know somebody who wants to) learn to sew, please let me know.  (Oh - and it'd be really REALLY good if it can be done by early next week....?).


On the personal front... I have a new book by a totally fab Melbourne girl.


And I had a lovely time at the launch last night.  (Kate sums up my feelings about it, beautifully).

Monday, October 18, 2010

On being adaptable...

I'm getting good at it.  I mean, good at making lemonade from life's lemons, silk purses from sows ears....

Last week I accidentally ordered these lovely big, flat, shiny 57mm o-rings.....

...instead of these lovely, shiny, chunky 52mm o-ringsVoila! We now have a lovely (if slightly unexpected) new product!!

We also have the Olearia, which was to be my second attempt at making a sleeved knitted-in-the-round garment. I thought I had enough yarn, but I only have enough for the garment sans-sleeve.
I'm putting the call out for any local people who might be in the Lincraft city store*, to grab me a ball or two of this Lincraft brand Superwash 100% wool in the most indescribably middle-green you could imagine.  Lovely colour, but nothing like anything in nature (that I can think of).

*I made a special trip through peak-hour traffic today, to the Northland store, from whence the green yarn came (....and where a few weeks ago, it was on sale for 50% off and I walked past it, smugly thinking I had 4 balls of it already.  It now appears that I had 2 balls of it ...or I've lost 2...?). 

There is no more of this yarn in Northland, dammit.  It is highly likely that the wee girl will have yet another sleeveless cardi. I'm adaptable like that.

Edited to add: I don't even know the colour number, least of all the dye-lot, and understand the almost-helplessness of the cause... but I'm willing to leave it in the lap of the knitting gods to see if this Olearia ever has sleeves or if I will be making lots of small mis-matched green projects fom here-on (Superfrogs, perhaps...?).


We may also be adapting to new digs soon, all going well with lease contracts and whatnot.  Don't want to jinx myself with premature announcements and details, but I'd like to give you a bit of a heads-up that we'll be moving soon-ish.  Stay tuned.  If all goes to plan, it'll be FABULOUS!!!

Thursday, October 7, 2010

My Creative Space


With lots of disruptions to family life in the last week, my knitting time has been somewhat fractured, my mind somewhat distracted.  I keep losing the instructions and losing my place.  I keep knitting the wrong row. 

Right now, I'm back to where I was on Monday morning.


In the non-knitty creative space, there's been quite a bit of photography, photoshop and web updates - including 25mm magnetic snaps.... which I've spent too long on already but am considering re-shooting.  They're actually really shiny.

Pop over to Kirsty's to see what everyone else is up to.

Tuesday, October 5, 2010

Twist and Shout ("Yippee! My bag looks FANTASTIC!")


Yes!  We have twist-locks!
And now we even have a tutorial on how to use them!!

As with magnetic snaps, these fittings were designed for use on leather, so I've included a few steps to ensure longevity when you use them on fabric.

A BIG IMPORTANT NOTE BEFORE WE START:
Make sure that the fabric is interfaced with fusible interfacing to secure the fibres of the fabric.  A layer of wadding (fleece) or a thick non-woven interfacing (such as Fast2Fuse) is also needed on the bag to support the weight of the lock.

These instructions begin at the point just before you attach the lining to the facing of the bag. 

1. Place the flap of the bag in the closed position.
2. Find the horizontal centre of the flap and stick a pin through at the point where the twist-lock will sit.  Push the pin through to the front of the bag body.
3. Mark (with a small dot) where the pin goes through the bag body.  This is the vertical placement of the lock.  (I use a Clover white marking pen on dark fabric.  It disappears when you iron it, so it doesn't matter if you accidentally mark the wrong spot).
4. Use a tape-measure or ruler to check that the placement dot is centred horizontally as well, and then mark the fabric with a cross.
5. Using the twisty bit of the twist lock, mark where the prongs will go through the fabric, centred over the cross.  (Apologies for appalling photos!!)
6. When you have to cut accurately through many layers of fabric and interfacing, it's easiest to use a knife of some sort, rather than scissors.  I use my Olfa point cutter, but you can equally use a Stanley/utility knife or paper-craft scalpel.  

Put a cutting board or block of soft wood (pine or even balsa) inside the bag body, underneath the placement mark.

Err on the side of too small (rather than too large) as you cut through all layers of the bag body on both of the 'prong' marks. You can always cut them larger later on, if needs be.
 
7. Use a scrap of thick interfacing (such as Fast2Fuse or Peltex) or several layers of fabric to make a support piece for the back of the clip - about a 2-3 inch square.  Cut slits through the support piece as well.
8. Push the twisty bit (that's the technical term, isn't it...?) of the lock from the right side of fabric, through the slits in the bag body.
9. On the inside of the bag, push the support interfacing/fabric over the prongs (where they come through the fabric). 

10. Place the metal plate over the back of the support interfacing and prongs, and then fold the prongs inward. If you can balance the twist lock on the table, a quick little tap with a hammer will help to flatten the prongs.

TIP: If the sharp edges of the prongs are going to damage the bag lining, you might like to add a layer of Vilene S520 or Peltex on the back, as shown here for magnetic snaps.  I haven't bothered with that here.
Ok.  That's the twisty bit IN!

Onto the flap....

11. Using the top plate as a guide, centre the hole over the placement mark on the front of the flap and trace it through with a fabric marker.
12. Again, you will have more contol over accuracy - when cutting through several layers of fabric - if you cut directly DOWNWARD (rather than with scissors).  I use a saddlers punch to cut two holes near each end of the oval shape.... (a slit with a sharp utility knife through the length of the oval would also work). 
 13. Use the sharpest small scissors you own to snip away the oval shape, including the pen marks.  (If you have punched the two holes, you can easily snip from the edge of one hole to the other. By doing this on both sides, you have created a rough oval shape, which will only need a little bit of tidying up).
 14.Ok.  This is where my neurotic perfectionism comes in....We've just cut through centre-front on the bag.  We're going to place a feature fitting, which is also the major stress-point on the bag.  What we don't want is a feature point becoming the first place to show wear-and tear.  Likewise, we don't want nasty little raw ends poking out through the centre of that lovely, shiny front plate.

I use a bit of Fray Stoppa around the cut edge of the hole to stabilise it.  It makes the edge a bit stiff and easy to trim, and it stops further fraying.  You may find another product that does the job (liquid embroidery stabiliser, perhaps?). 
Let the Fray Stoppa dry before proceeding.

15. Place the front plate on the table and line it up under the hole you've cut.  Give the (stablised) fabric another trim, so that it sits neatly around the lip on the hole of the front plate (with no overhanging raw edges).
16.  A wee drop of fast/clear-drying craft glue on the front plate (spread thinly so that it doesn't goop out around the edges) will hold the plate firmly to the fabric. 
Call me neurotic and ignore me if you will.... but I find this step makes it easier to put the back plate on (and it reduces the possibility of wear and tear between the fabric and metal). 

17. Push the hole back over the lip of the front plate and press the fabric into the glue. 
It should stay nicely in place.... (You can do any touch-up trimming that  might be needed to eliminate raw-edge overhang for good!)
18.  Pop the back plate on and fold over the little tabs.
 Voila! Shiny, shiny and super-slick twist lock... that will never EVER pull through the fabric!!!

They're now in the shop - HERE!