
 My new sunglasses case has a slick hidden magnet to close it...
  It looks very sweet in two-tone floral, and it works well, too - I've road-tested it in my bag for the last few days.
Here's how to make one....
1. Cut 4 x rectangles of fabric 12cm x 28cm (4 + 3/4" x 11"). Two of these will be linings and two will be the outsides of your purse. I cut contrasting fabrics for the outsides, and interfaced them with medium-light interfacing.
2. Layer the rectangles as if they're made into a purse - right sides of linings facing one another, with the 'outside' fabrics facing outwards on either side of the lining pieces.
3. Fold all layers and press a crease 12cm from the edge that you'd like to have as the 'flap' on the case. I placed the large rose print carefully when I cut the rectangles so that it would be on the flap.

4. Keeping the fabrics layered in their "finished purse" position, lift up the first layer of the flap (the large rose print in this case) to reveal the wrong side of the flap lining.
5. Draw a cross for a magnetic snap placement 3cm (about 1 and a quarter inch) from the flap edge and 6cm from the side. 6. Pin a sew-in magnet into place - centred over the cross. Also push pins through all layers of the fabric on both side of the magnet.
6. Pin a sew-in magnet into place - centred over the cross. Also push pins through all layers of the fabric on both side of the magnet. 
7. Lift up the front layer of the outside fabric on the 'body' of the purse (the blue fabric pictured above) and use the pins to guide the placement of the other side of the magnet. It will snap into place. Pin it on to the fabric. 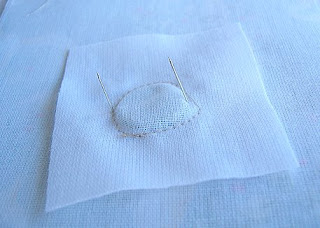 8. Sew each magnet on to it's respective piece of fabric with a square of stitching (see below).


8. Sew each magnet on to it's respective piece of fabric with a square of stitching (see below).9. Place the two lining pieces and the two outside pieces right-sides together.
10. Stitch aroound the side seams and across the base of each pair in a squared U-shape - pivoting at the bottom corners (see below). Leave the top end open (this is the short end closest to the 'flap' crease-line).
10. Trim the seam allowance away from every corner as shown below (the "3cm rule" for anyone who has done a class with me or used on of my patterns).
11. Press the seam allowances open on all sides of each piece. Fold and press a 1cm hem around the open ends of both the lining and outside purse pieces.
12. Turn one piece to the right side out and use a paintbrush or chopstick to push the other piece inside it (with the wrong sides of fabric facing each other).
 13. Line up the folded edges and pin them together. Topstitch the edges together with one or two rows of stitches.
 14. Give the spectacle case a final press.
 You could change the proportions of this purse to make any number of other pouches, purses and bags.
Enjoy!
PS. You may have realised that the first picture is not exactly the same as the one in the rest of the tutorial. It's my crash-test dummy, and I "re-made" it to write the tutorial.
5 comments:
My goodness, I was just thinking about making one of these for Ollie the other day for his little sunnies! Thanks for the tute.
Oh how fabulous, thanks tons for sharing. I'll be linking!
That is a great gift. I still haven't had another sewing session since class but I will have to add this tut to the list.
This is perfect timing, my boyfriend's mum asked me to make a sunglasses pouch for her for Christmas and your tutorial will take all the guess work out of it for me. Thank you so much! I love the idea of the magnet too.
great tutorial
I have included it in my Gifts To Sew For Christmas round up
http://jojoebi.blogspot.com/2010/10/lots-of-gifts-to-sew.html
thanks
jo
Post a Comment