
My relationship with leather hasn't changed since then. I'm a textiles gal at heart, but sometimes I think something will look good made in leather... so I make it.
It's a quirky, tricksy material to wrangle - and completely unforgiving if you make a mistake. I'm not a fan. However, I'm often asked for tips to make the job easier, so here goes...
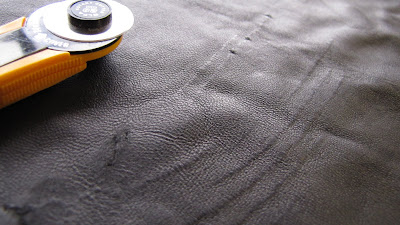 1. Before you mark out your pattern placement, examine the hide and look out for scars, holes and imperfections.
You have to remember that these hides were once on animals - walking around in fields (or barbed-wire-fenced paddocks, if you're in Australia) and scars are are random feature. You don't want to cut out a pattern piece, only to have a hole or other imperfection spoil it (and have no hide left to re-cut).
 2. You can't pin leather, so (unless you have a clicking press and press-knives), cardboard patterns and pattern-weights are the way to go. Trace around the patterns with with a special silver pen (or ... ummm.... a plain ballpoint pen or rotary cutter, if you're as completely reckless as I am).
NOTE: Garment weight leather can usually be cut easily with a sharp rotary cutter or scissors. Some people use a stanley knife and steel ruler (but I've nearly lost fingers doing that, so I can't recommend it).

 4. You can purchase special "leather" sewing machine needles, which will penetrate the leather more efficiently than normal machine needles and form a nice even stitch. Well worth it.
6. Interfacing can be fused to leather if you need to add a bit of structure - use a rajah cloth to protect your iron and the leather. Cut the interfacing shorter than the seam allowances to reduce bulk.
7. Pressing seams open can be a bit tricky - garment leather generally doesn't hold a sharp crease well. Use double-sided tape to hold seams flat. (Although, try not to overdo the tape on areas that will later be stitched - it can gunk up your needle).
 I prefer to flat stitch seams open from the right side of fabric.
 ..and then trim away the excess seam allowance to reduce as much bulk as possible.


10. I'd like to make a 10th tip, just to be neat and decimal about things.... but I'll leave this one open as a question.... Do YOU have any leatherworking tips or questions to add to these?
...So anyway, what was all this leather-sewing business about...?

73 comments:
Handy tip no.10 Get someone else to do it for you. I can see why leather is not your favourite thing to sew.
By the way it's never too late to join the French resistance... All you need now is the 'Allo Allo' accent. Don't know if you got that comedy clasic in Australia or not but your beret would be right at home.
I really like to work with leather, so I will add a few more tips ...
A. Use butterfly clips instead of pins to hold pieces together.
B. Use studs liberally to hold multiple pieces together when it gets too thick for your sewing machine. They look cool too. Make sure you get the right size stud setting tool, and thwack hard with a big mallet to set them.
C. You can cut difficult patterns, or cutout pieces for inlay or overlay with an exacto blade.
You look fabulous, Nikki!
Thank you for another really interesting post and all those great tips. I have never tried sewing leather (and now I feel both informed ... and duly warned!)
The lady just keeps on giving! Good tips and man I want one of those plastic gadgets - any idea where to get them locally? And the hat is fantastic!
Great tips. I think I should invest in some of those plastic slidey things to get over bulky seams.
The hat is fabulous!
Your picture and the reference to joining the French resistance made me giggle. Those are great tips Nikki. I have a couple of pieces of leather that I haven't had the guts to use yet. One day.
10th tip- letaher needles are good for clear vinyl, too! Just yesterday, I found this out! Stops skipped stitches, like you say. I'm delaying buying a teflon foot, hoping my walking foot makes if a bit longer! Thanks for the rest of the tips, though, great hat!
Cool hat - I always wondered what those plastic things were for in my sewing kit that came with the machine!! Some great tips!
One I will be leaving completely fort the experts- I use little peices here and there on my softies - you are right it is very unforgiving!
I've always wondered how one would go about sewing leather. I'm not sure that I'd ever be game to try making a complete piece out of leather, but it's good to have the tips if I ever want to use it for embellishments or handles or something.
Nice hat by the way!
You look great! I have never sewn with leather yet but am sure interested in trying some time, so these tips and tricks will be very useful. Thanks for sharing!
You look great! I have never sewn with leather yet but am sure interested in trying some time, so these tips and tricks will be very useful. Thanks for sharing!
You;re gorgeous too! Thanks for the tips - you look great.
great hat.
Thanks- I think I will wait awhile for the leather experience!
All the rest of the useful information aside .... I LOVE your use of the word "hide" in this post. So untamed.
Nikki, that photo so has to be your profile pic !!!
Thanks for all the tips. I am loving the look of that plastic gadget as well..
Ooh, you do fabulous French Resistance! So anyway, Ms expert on leather sewing and tent mender and veritable font of knowledge. Don't s'pose you have any advice on mending protective trampoline pads? Now how's that for bringing something in from left field?
Your pic reminds me of the French resistance woman from Allo Allo: "listen very carefully, I will say ziz only once!"
These tips (and comments!) are fantastic! Thanks so much for these, I'll be linking.
HAHA Bellgirl took the very words right out of my mouth. You do look like Michelle on 'Allo 'Allo. If you want some good laughs, there are epidodes on YouTube.
You are amazing with all of the good things you come up with. Do you ever rest??
Hello Nikki! We think this tutorial is great, and we want to share it with other sewers by featuring a link on WeAllSew.com! We’ll be featuring a link to this tutorial at our Free Stuff page all next week. Please let me know if you have any questions, or if you would not like to be featured through a link on WeAllSew.com. Thanks so much-Erika
I have a question - I have heard that you should never backstitch on leather, but tie the thread instead. Is there a special way to tie the thread? I would love some pointers. Thanks! - Mo
I'm not sure these are good tips
tip #11 - put a tiny bit of baby powder on the sewing machine surface to let the leather slide easier.
tip #12 - start 1/4 inch from the edge, and then sew then go back and sew the 1/4 inch in the opposite direction.
tip #13 - I use a paper stapler to staple pieces together before sewing. Make sure you're stapling where it doesn't show, and where you won't hit the staples with the needle.
Thanks for taking the time to share this. I'm about to recover a couple of vintage hydraulic styling chairs. Lots of great tips! I'll try and follow up after I complete the project.
You look fabulous in that hat!
Love the post and these tips will come in handy.
Hi Thanks for the onfo on sewing leather on a sewing machine I am trying to sew a bear made from a fur coat and found your tips helpful. By the way I like your hat too
I have been sewing patches on biker coats,vests,etc..Recently I took in a vest for a biker chick . She lost some wieght and cause I thought I was getting that good. (WHAT A DUMMY I AM!) Seaming it back together I have been getting skipped stitches,loose,stitches,all the good stuff. I have a brand new household sewing machine,walking foot,correct thread and needle.. It has done really well with the patches and other stuff.....Since I am a preschooler at sewing,could you please tell me what the lil white plastic deal is or the name of it,,, please? And anyone willing to share any other tips before I throw this vest out the window and have an angry biker chick on my hands...Please and thank you in advance!
(Frustrated attempting to sew guy)
Guy who was sewing for the biker chick (better late than never?): the thing is called a Jeanamajig in some circles. I only know where to get one in the U.S. My suggestion is to Google the thing. It's also called a seam jumper, I think.
thanks for the tips..much appreciated. My question, the leather fabric I am sewing still twists and bunches. When I am done it is uneven and stretched. How can I fix this? What am I doing wrong?
Hi there,
What sewing machine did you use? Will it be easy to source it? I live in Australia so we don't have much resources as Europe.
I'm just starting out learning about making bags as I love leather handbags. So your tips were really helpful thank you.
Thank you for this! You cover details on finishing touches that some bloggers skim over. I appreciate it a lot!
My Special Tip is: use rubber cement to hold a paper pattern to the leather while cutting.
I saw rubber cement in a leather kit and decided thats what it was for and it worked marvelously. I'm just having sewing issues now.
You can also use masking tape to hold pattern down for cutting and keeping pieces together while sewing. and reducing the tension a little can give better stitches and prevent stitches skipping
I am new to leather sewing, so I don't know it this works on leather, but when sewing fabric that stretches, the machine feeder will sometimes stretch the bottom piece. To solve this you can put a plain piece of paper under your work, sew, then tear the paper away when you are done.
Thanks for posting this.
I would add that if you are going to use a Stanley knife, to buy some Kevlar gloves. They're not expensive, and they reduce the risk somewhat.
I found mine as an accessory to those slicing machines that people use for slicing deli meats and such.
thanks for the great tips on sewing leather. Will try it soon. Have an industrial sewing machine and have been wanting to try it. Ute
Thanks for the leather sewing tips. I am about to tackle a jacket after keeping the leather warm in the cupboard for about ten years. I have made up the pattern in wool and made some pattern adjustments, so now ready to cut into the leather. I was curious to know if interfacing could be used in the collar and front bands, so now I know. Thanks.
Nice post, thanks for sharing :). I've mainly used thick belt & saddle leather so far (3-4mm/10oz). Re. Stanley knives, there are a couple of things that might help:
1. Single-hook blades, made in Sheffield, sold cheaply on ebay. I have a fancy proper (walnut handled) clicking/clicker's knife too, which I rarely use (waste of money) - the blades of the 2 knives are almost identical in thickness & shape, and both can be stropped/re-sharpened.
2. A safety ruler (has a guarded or raised area for fingers). Fortunately I found these early by chance - probably saved my finger-tips! I use the 12"/30cm Maun Safety Rule is made in England & distributed by Jakar - widely available on web for under £5. ;)
I use & like a "roundy" vintage Stanley 199 handle - I think they still make them - but any model will do.
-T
Just discovered this post. Thanks for the great tips on sewing leather. Plan to use them soon with a repurposing project. Love your hat!
What kind of machine could i use for sewing leather?
How do you sew leather by hand? I cant use I sewing machine I have tried loads of time just mastered it.
I am making a plus size skirt but I am worried its going to look like a bin bag.
Kay
http://clotheskays.blogspot.co.uk/
These are all great tips that I'm going to have to use. My grandpa passed away a few years ago and left my grandma all alone. I go and sew with her once a week to spend time with her. I'm not nearly at the level she is but hopefully with these tips I can slowly get there. http://www.hifashiongj.com/machines.htm
My mom made vinyl and leather pocketbooks thru the 70' s. I remember she had an industrial sewing machine, but no fancy attachments. She always had a small bowl sitting on her machine with a sponge soaked in mineral oil, she would actually oil the pieces that were going into the machine so they would slide through the feed dog. It worked for her, she made at least 500 or more purses this way and also upholdstry. Note: the seams were wiped down afterwards, the rest evaporated. Another tip for the lining, she sewed vinyl to cardboard inserts, the thickness of cereal boxes, and inserted them in the finished purse.
Ms.B April 24, 2015
I love the hat, I have made one like it of denim years ago. I have a Bernina 1230 sewing machine and I couldn't live without it. I have had it for 25 yrs. It is in the shop now because I knocked it out of alignment sewing the corner of my sons cargo shorts (many layers). The last time I had to have it fixed 4 years ago it cost me over $500.00. Well worth the cost. This time I get off cheep only about $100.00. Still cheaper than $3000.00 for fancy new one. However, the reason for my post is to ask for help. I can sew two layers of soft/thin leather but when I try thicker leather soft or stiff I get frayed thread and skipped stitches. Please email me with any suggestions. Beeinspired100195@yahoo.com
Thank you
You are a star Nikki!! Thanks a mil for the letter tips, I have had to discover so much by trial and error and your tips are generous and time saving! Thanks for. Sunny South Africa!
Hi Nikki, thanks for the tips! I think I need to try those plastic things you mentioned in point 9, however the link has expired. Any idea what they are called? Many thanks! :-)
Thank you for the tips Nikki. I've been sewing with vinyl here and there on purses. I use a home sewing machine and Teflon foot but the vinyl still sticks to the foot and or the machine. I had to use a thin piece of paper in between the foot and vinyl but it's so tedious. I'm going to see if I get that plastic gadget thingy, the baby powder and or the mineral oil dipped sponge see if any of those methods help. Thanks a million.
you can also use a small piece of soap (yes the last little bit that nobody wants to use any more) to mark your pattern on the back of the leather. Works great and of course leave no marks.
I loved this post! I have made some good money in the past doing upholstery with leather, always a challenge. It would have helped if i knew this first. The rough way I have dealt with similar problems is this. My hammer is my good friend to smooth seams flat. Hit only from the wrong side.
I use shoe glue after that to keep the cut seams flat.
and I use masking tape to help smooth the feed of the leather under the needle when sewing on the suede side of the leather.
When I top stitch, I use normal machine oil and a small sponge and 'oil' where I will sew. This I do with any normal steel foot.
The finished product is then rubbed with dubbin and left in the sun(or use a hair dryer on hot)then polished up.
I rub a small amount of beeswax on the outer seams to stop the cotton from perishing.
I also follow this last method if I need to help 'curve' a piece of leather.
This was fun, hope it helps someone. :)
Thanks for this thread.
Just discovered the maker of my mocs isn't doing so any more, and am considering making my own. These tips were all helpful!
You are a star Nikki!! Thanks a mil for the letter tips, I have had to discover so much by trial and error and your tips are generous and time saving! Thanks for. Sunny South Africa.
wallet wallet
Nikki, thank you for posting the tips for working with leather! When all else fails, reach for the stitching pony! I absolutely love your hat! Someone else here mentioned that she made one, who's pattern is it? I have some leather that is looking for the right pattern. :)
Get your beret pattern here... http://www.nicolemdesign.com.au/shop/digital-downloads/2408-beret-.html :)
xxnikki
Thank-you so very much for your tips, you have made it a lot easier for me...I really like your hat too.
Try putting a bit of scotch tape on the bottom of the presser foot and also on the needle bed to keep the leather or vinyl moving along. www.amongbrendasquilts.com
Hi,This was realy helpful for me. Thank you :)
Hi, I made a lamb skin purse, I first cut the pattern pieces out of muslin. It made it so much easier to get the placement on the skin the way I wanted & it held to the skin without any anchoring needed.
I used the microtex needle because it doesn't put holes in the leather yet very sharp. I only switch to a leather needle where I had multi thicknesses to sew.
Used a pad & fleece over the pad to either pound or iron because the leather will get imprints even from the ironing board cover. When fusing interfacing used a brown paper bag cause the glue comes up, does not melt like on fabric & it will get on your iron. You can't use a hot iron or steam as it will stretch the leather. Otherwise I use organza as a pressing cloth.
Get Cold Rubber Tape for areas that will stretch. Purchased online from a company in NYC.
Interfacing made it easy to sew & it did not stick. I used a high quality of interfacing.
I make leather purses. But I have one step that is giving me fits. I make a separate zippered clutch made of leather outside, fabric inside with 8 plastic pockets for cards on each half of the folded clutch. My problem is how do I keep the thing centered and perfectly straight when I go to sew it onto the outside of the actual leather bag? Sometimes I am pretty good, but a couple times I thought it was straight and it wasn't. I can't seem to get a consistent way to keep it straight every time.
Hi Robbie,
If shifting is the problem have you tried placing doubled sided tape to hold in place then sew?
If it's a marking the outside issue I've found the Pilot FriXion pens work very well. They are a fine line & erase with water. I would test the fabric first.
http://pilotpen.us/categories/frixion-erasable-ink-pens/frixion-ball-clicker/
Thanks Lindalouise. You got in before me (I have trouble logging in to this blog these days). Double-sided tape is absolutely the thing. If you can get Nitto brand, it's the biz - but I haven't seen it for years (I haven't worked with leather much for years).
Hi Nikki,
The only double-sided tape I am familiar with is the Dritz WashaWay.
I realized Robbie is talking about stitching on leather so the pens would not work. What she could try is using a soft lead 6-B drafting pencil.
Please let us know what works for you Robbie
Hi Lindalouise. I think that because I am using leather a regular double sided tape may work. Since it will be underneath and will not show anywhere. I have some regular (not the foam type) that I am going to try. I'll post once I get back to it. Have another project taking over so I can't get back to my purse yet.
Thanks for the tips...I have been asked by my Husband to make him a leather vest. I found this as I was searching for tips and tricks for sewing with leather:) I have a question and a comment: What thickness of leather would you recommend for a western vest?
Tip #14: Slip a piece of tissue paper between the leather and feed dogs to help the leather/vinyl and other similar fabrics from sticking.
Thank you,
THANK YOU so much for this post! I was having trouble getting skipped stitches when attaching the handles, googled and found your post about using the hump jumper, a brand new needle and to switch to the teflon foot. It totally worked, NO skipped stitches. THANK YOU!!!
Here's one for you all. I am making gymnastics grips and the leather is ripping away form the Colton webbing when placed under pressure. What am I doing wrong and how can I fix it. The leather is 1.6m suede and its ripping across like a cheque butt on a perforated line.
* Is fusible interfacing same as stay use for fabric.
* What size of needle can i use for sewing bags and shoe.
* What kind of presser foot can i use for sewing bag/shoe becos i use the black type of sewing machine.
I am trying to make a tank top with soft leather. A problem I have is the leather gets stretched and curved from the presser foot, so it comes out buckly/wavy and the top piece gets stretched longer than the bottom. I am using a regular foot. Please give me some advice.
Nancy - As I suggested... all of the above. Teflon or walking foot and double-sided tape are your friends.
Nancy you need Cold Tape. It will stop the stretching. You can purchase it here:
http://www.americansewingsupply.net/shop/index.php?main_page=product_info&products_id=380
Hi, could you please help me? I tried to sew leather (old leather skirt, so not too thick), but my machine would not make a stitch! The leather moved under the presser foot easily, needle pierced it without problems, but the threads would not tie (? Is this the right word?) Simply, not a stitch was sewn. The needle was new, I tried several, leather and non leather needles of various sizes, different threads, re threaded, tried to change the tension...nothing. The machine is old but a workhorse of a great quality, it sews everything, even several layers of denim or softshell. Do you have any ideas what I could try? Thanks!
So helpful thank you! Wondering, it looks like the link is broken to the plastic leather foot thing you mentioned- could you give the name of it or some other way to find one?! Thanks much!
Christine, the link is broken because the post was written over 6 years ago and we no longer have the online shop. The thing is called a jeans-a-ma-jig or they are sometimes just weird shaped plastic gadgets in your sewing machine kit. plastic collar point turners sometimes have a section that can be used for the purpose.
You may have too many stitches per inch and/or using needles (or if you're pre puncturing holes) that are too large, you may need thicker suede too. Also, since they are put under a lot of stress, you may need a different type of stitch. I am not familiar with what type of stitches, leather weight, or spacing that are used on the bottom side of stirrups for horseback riding- but I am sure you cpuld find out online- i feel that would be a great fabrication model to base your grips upon
Hi! this is awesome! i just started working with leather over a year ago. i hand stitch all my work but i am considering on learning how to use a sewing machine. Will the same concepts of fabric machine sewing apply to leather machine sewing?
Post a Comment