Well, as anyone who has been to one of my bag-making classes knows, I really have a LOT of words to say on the subject.I bang on endlessly about the importance of snipping and clipping seam allowances and "giving that wadding a little haircut...", and I use the term "reduce the bulk in the seam allowances" more than anyone else I know. I leave interfacing and wadding on seam allowances when I want to create a structured edge on a topstitched bag flap - or to make a flat-stitched side-seam stand upright - but yesterday I didn't want to topstitch the Clutch flap. I was going for a clean-line look. I treated the seam allowances as I would on a seam that I wanted to press open and flat, and not topstitch.
HOW TO REDUCE BULKY SEAM ALLOWANCES
1. Pull the wadding and interfacing away from the seam allowance. 2. Trim off the interfacing as close to the stitching line as possible. ("You could use your duckbills for that", as my wee girl would advise. Nothing like a two-year-old who knows her sewing tools, huh?).
BTW - I love my duckbill scissors. They hold back and protect the seam allowances as you snip with the pointy upper blade.  3. Trim the interfacing AND wadding off the other side and clip the corners of the seam allowances.
 4. Press the seams open (oops- forgot to take a photo)
5. Turn the flap through to the right side (I can show you a good "pointy corner" trick, but you'll have to come to a class for that because it's an ACTION demonstration!!).
6. Give it a good steamy press!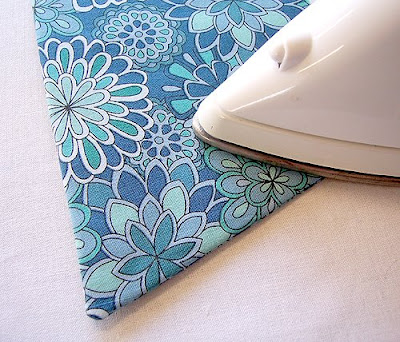
Of course you can always cut your seam allowances off your interfacing before you fuse it, but I find that I can be more accurate with the trimming if I leave it on until it's sewn. I also do a lot of block-fusing of fabric and interfacing before I cut out small bags and purses - that's more accurate, too.
Copyright Nicole Mallalieu 2008
Edited to add: Duckbill scissors are now available here!


 ...until I ran out of the red spotty fabric for the neck binding on the second bib (but that's another story).


 I couldn't find my

 Unless you plan to make a lot of patterns I wouldn't think pattern notchers a very sound investment. You may be able to find a substitute among
  ...and that notch thing? You can draw a line into the notch to show you where to put a 2.5mm snip in the edge of your seam allowance. (That's more accurate than those triangle notches on a lot of big-brand patterns). That's all you need for matching up important points when you're at the sewing machine.


 When I was 11 years old I wanted to be a SEWING teacher. By the time I hit high school I'd found out there was such a thing as a FASHION DESIGNER....
  Oh yes, please! I'll be one of THOSE! (looks like I stretched my yellow school skivvy!)


 I'm in love with the
 I get excited about things like that.
  People always asked me why I made hats, and that's the best answer I could come up with.